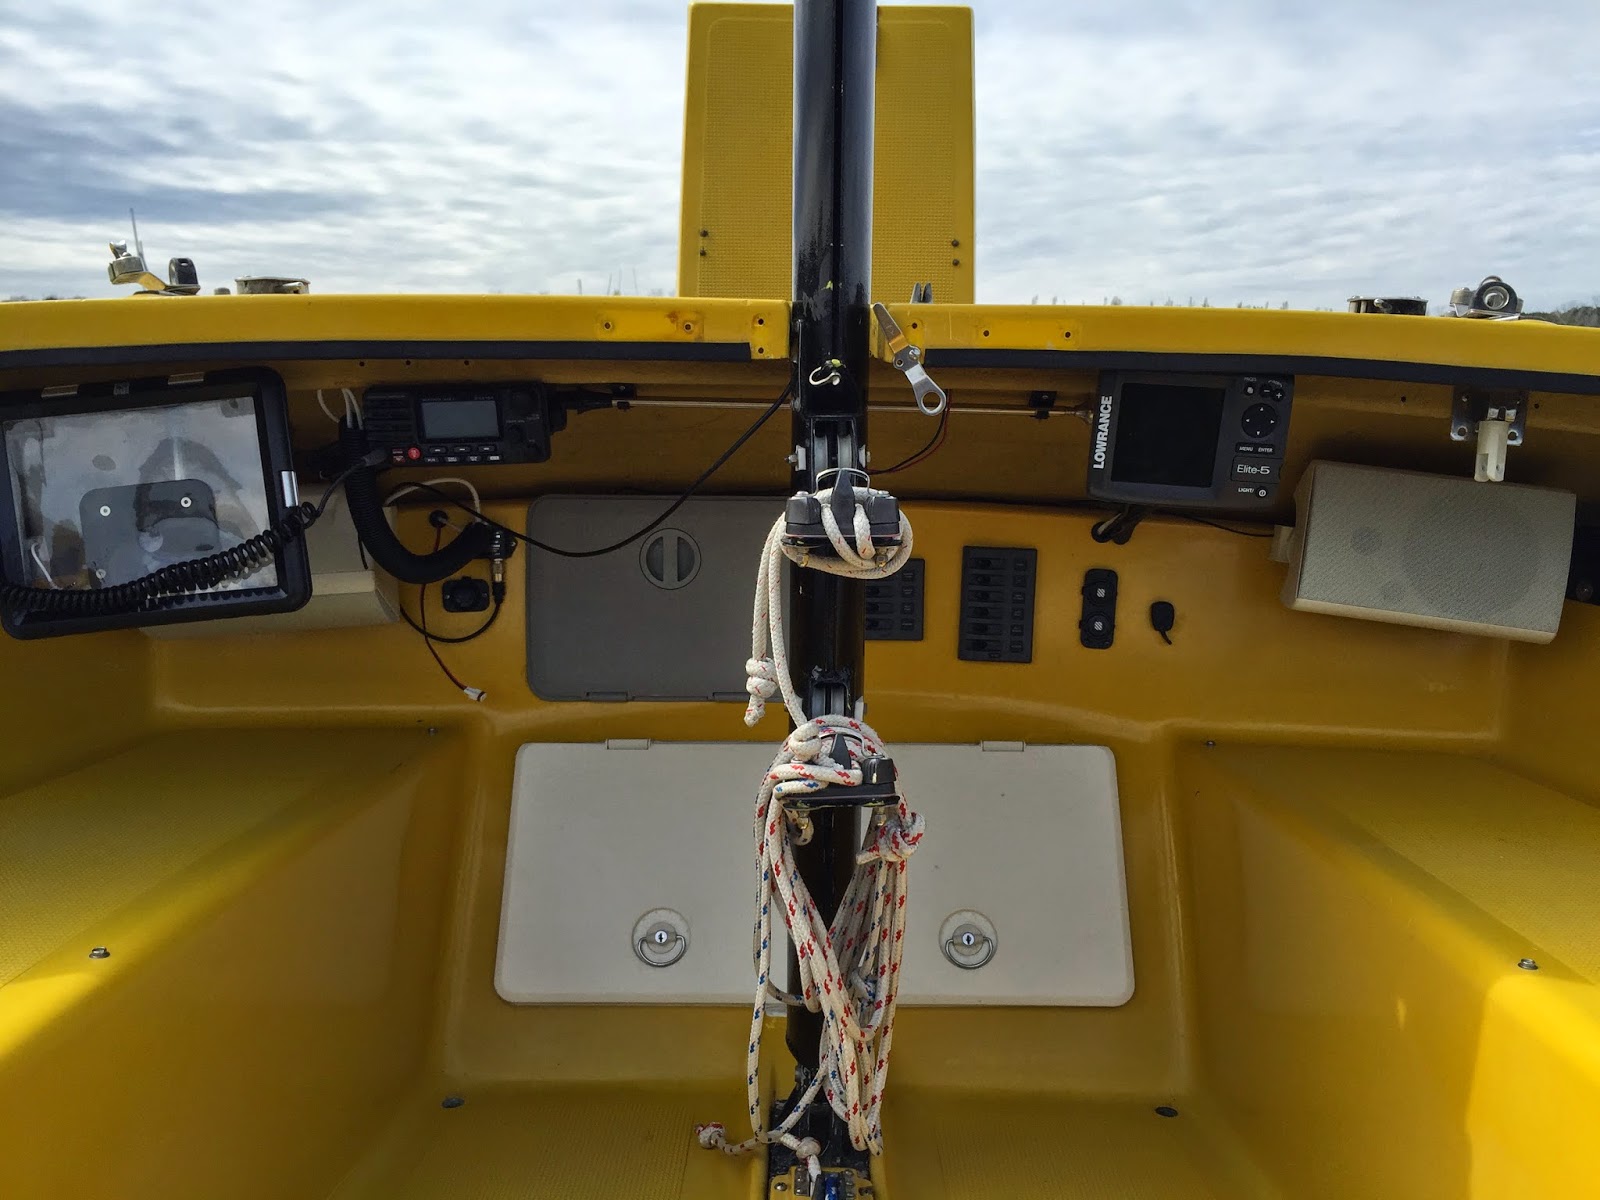
- Electronics
- Stereo - Pioneer App Radio original from my old car along with some outdoor speakers I had left over as well. Yeah, these are not really intended for the marine environment, but they were "free". So, let's see how long they last.
- Fixed VHF with AIS Receiver - Standard Horizon Matrix AIS / GX2150 - I wish I had know about the GX2200 before I purchased the GX2150.
- Chartplotter/Depth Sounder - Lowrance Elite 5 - I'll use this to drive GPS into into the GX2150 for AIS and to control the autopilot.
- Autopilot - I have and old (purchased in 2004) Autohelm 1000+ (now Raymarine)
- Lights
- Side Lights - Aqua Signal Series 33 LED Navigation Lights
- Stern Light - Aqua Signal Series 33 LED Stern Light
- Steaming / Anchor Light - Innovative Lighting Telescoping All Around Light
- Misc
- Rule Automatic Bilge Pump
- Blue Sea Double USB Accessory Plug for iPhone and iPad
- Standard 12V Accessory Plug

Shown from left to right - Bluesea WeatherDeck 4, Bluesea WeatherDeck 6, 2 x 12V plus, and Autohelm ST 1000+ remote control plug.
Then, there were additional items that needed fuses which needed to be considered in the fuse block count including:
- Engine Alternator Input
- Solar Panel Input
- Charge Controller

From left to right on top - Back side of BlueSea WeatherDeck panels and backs side of stereo unit.
From left to right on bottom (see closer view below too) - back side of battery switch (round & red), positive terminal strip, non-switched BlueSea circuit breakers, charge controller, and negative terminal strip.
OBVIOUSLY I HAVE A BIT OF WIRE CLEAN-UP LEFT TO DO! ;-)


A closer look at the charge controller.
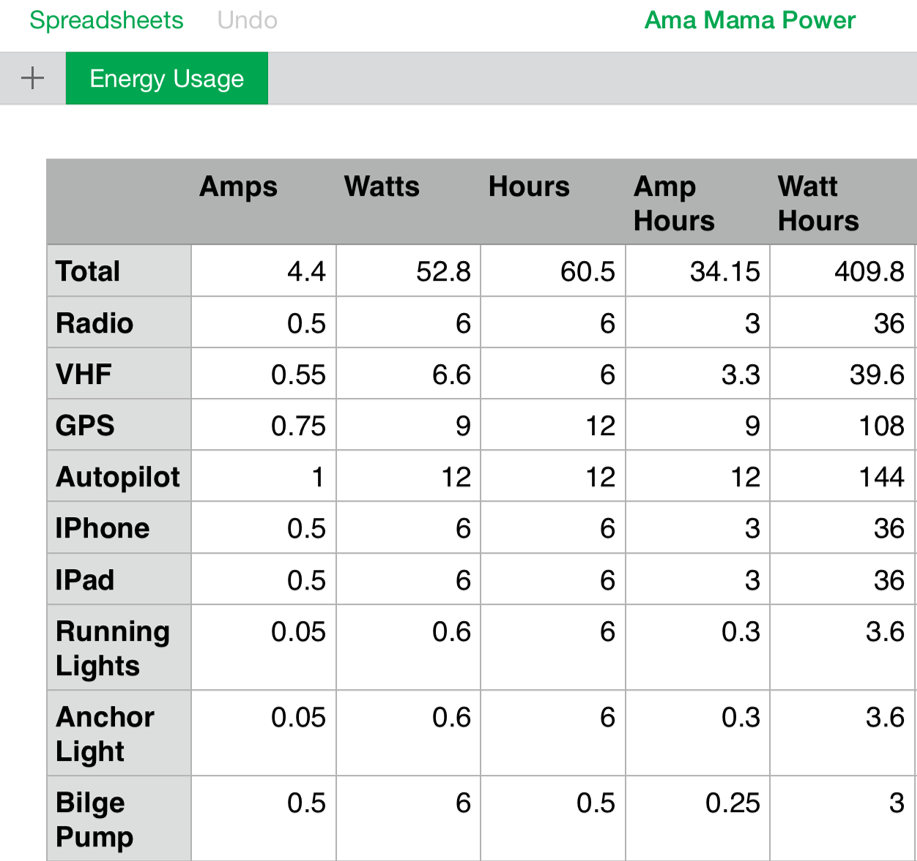
From this, I decided that I would go for a 92 AH AGM battery and a 100W solar panel with an additional 15W solar panel that could be deployed at anchor. As a back-up, I had a shore power charger left over from my earlier attempt to have a battery on Ama Mama that I will throw on-board in case I need it when I get to a dock. In summary:
- Battery - Rayovac Pro AGM Marine Deep Cycle, Group 27, 92 amp hour battery.
- Charging Sources - I want to have multiple sources of charging including:
- Outboard Alternator - I had Austin Action Marine add and alternator to my 5 HP Nisson Outboard. It only outputs 6 AH when running, but every little bit helps.
- Solar Panel(s) - I purchased a 100W AFP panel that I will stern mount while underway, and a 15W panel that I can deploy at anchor
- Shore Power Charger

This is the 15W panel I use to keep the battery topped up on the trailer, and I can also use it at anchor. It store nicely in the bow locker on it's side.
 I keep the shore power charger and extension cord in a plastic box in the aft locker. Hopefully, when I add a 100W solar panel I will not need to carry this any more.

As you can see, my initial plan called for a 6 circuit breaker panel for items I wanted to be able to turn on and off from the cockpit, and a second fuse block for other items. As I thought about it more and started to install equipment, I changed things around a bit and ended up with a 6 and 4 switch panel in the cockpit plus the unswitched fuse block. The list below shows my fuse panels, blocks, and one in-line fuse for all installed equipment. The numbers on the left of each item is the wire gauge used, and the number on the right is the fuse size. NOTE - I went with the Blue Sea WeatherDeck panels due to the open nature of the Tramp cockpit.

The last thing I needed to figure out was how to wire up my NEMA components. So, based on my NEMA equipment manuals, I sketched out the following wiring diagram to help guide me in the installation. In summary, I'm using the Lowrance Chartplotter / Depth Sounder to drive GPS to the Standard Horizon VHF with AIS Receiver AND way-point information to the Autohelm autopilot.

For monitoring the battery voltage level, I use an old meter (see below right) that plugs into a 12V accessory outlet which I used in my camper van in the past.

To the left above is a small inverter with USB plug that plugs into a 12V accessory outlet as well. I don't use this very often, but it comes in handy some times if I want to run my laptop.